Pegboard Accessory Layout and Selection Guide: Hooks, Holders, Bins, Spacing, and Load Planning
Quick Answer: Build a pegboard layout from the tools outward. Inventory the actual items, verify the panel and accessory standard, place frequent-use tools in the easiest reach zone, give each tool enough removal clearance, and choose hooks, cradles, shelves, or bins by the way each item must be supported. Keep heavy, sharp, awkward, or valuable items low and positively retained. Treat every load claim as a complete-system limit involving the panel, fasteners, wall structure, accessory, leverage, and installation—not as permission to fill every hole.
A useful pegboard is a work surface, not a collage of hooks. The layout should shorten the repeated motions around a bench while keeping tools visible, stable, and easy to return. That requires more than buying a large accessory assortment. A kit can include plenty of pieces yet still lack the right ring diameter, cradle width, projection, retention method, or shelf support for the tools you own.
This guide focuses on the decisions that happen after you choose pegboard as the storage format: compatibility, zoning, spacing, access, retention, load planning, installation checks, and future expansion. It does not replace the panel or accessory manufacturer’s instructions. My Garage Products is a discovery site; it does not design or certify wall-storage installations, sell or ship products, provide warranties, authenticate sellers, or process returns.
Choose the Layout Goal Before Buying Accessories
| Storage job | Useful accessory pattern | Layout priority | Common mistake |
|---|---|---|---|
| Daily hand tools | Short hooks, rings, clips, and small dedicated holders | Fast one-handed removal and return near the main task | Packing handles so tightly that neighboring tools must be moved first |
| Long-handled tools | Paired hooks, double-prong cradles, or purpose-built holders | Two-point support and swing clearance | Balancing the tool on one hook or storing it over a vehicle path |
| Power tools | Documented cradles, shelves, rings, or multiple supports | Support the tool body without loading a trigger, battery, cord, or guard | Assuming a generic hook kit is rated and shaped for every tool |
| Cords and hoses | Wide-radius loops, paired brackets, or reels elsewhere | Avoid tight bends and keep coils off sharp hook tips | Hanging the entire weight from a plug, fitting, or one narrow point |
| Small consumables | Shallow labeled bins for active stock | See quantity at a glance without overloading the panel | Using open pegboard bins for hundreds of mixed fasteners that need drawers or cases |
| Occasional accessories | Upper shelves, hooks, or labeled containers | Preserve prime reach space for frequent work | Giving the easiest location to rarely used items because they look tidy |
Start at the Pegboard Accessories collection only after assigning each tool to a row. The collection helps compare available formats, while the Garage Pegboard Storage collection covers the panel-level system. Keeping those decisions separate prevents a wall full of accessories that do not match the panel or the work.
Inventory Tools by Shape, Weight, and Removal Motion
Place the tools on a bench or floor and sort them by how they are picked up, not simply by brand or color. Record the widest body, handle diameter, center of mass, sharp edges, protruding parts, cable or hose, and the motion needed to lift the item free. A screwdriver may rise vertically from a ring. Pliers may pull forward from a clip. A drill in a cradle may need upward clearance for its handle and forward clearance for its battery.
Mark frequency as daily, weekly, seasonal, or reserve. The daily group earns the prime zone. Heavy or awkward items should not move upward merely because they are used often; the safer compromise may be a lower pegboard position, a nearby cabinet, or the Garage Power Tool Storage collection. The layout must respect both reach and consequence if the item slips.
Photograph the inventory or make paper rectangles with the tool dimensions. Templates reveal collisions before hardware is mounted. Include the full removal envelope, not only the hanging footprint. A 12-inch tool can need far more than 12 inches of vertical space when the hook must lift before it releases.
Verify the Pegboard Standard First
“Pegboard” is not one universal interface. Panels can use round holes, square holes, proprietary slots, or combinations. Hole diameter, spacing, board thickness, rear clearance, accessory wire diameter, locking hardware, and the shape of the engagement all matter. An accessory that enters a hole is not automatically a secure or manufacturer-approved match.
Use the panel label, receipt, manufacturer model, or installation literature to identify the system. Wall Control’s current accessory guidance states that its combo metal panels accept conventional 1/4-inch pegboard accessories as well as the company’s slotted accessories, while its slotted accessories are specific to Wall Control full-size panels and are not universally interchangeable. Triton likewise separates round-hole DuraBoard and DuraHook components from square-hole LocBoard and LocHook components. Its LocHook documentation specifies square holes on 1-1/2-inch centers, while its DuraBoard line uses a different round-hole pattern.
Those examples show why visual similarity is not enough. Read the pegboard hook fit guide before ordering, then use the metal versus hardboard compatibility guide for the material-specific tradeoffs. If the exact pairing is not documented, do not infer compatibility from a seller photo.
Divide the Wall Into Four Working Zones
Zone 1: the primary reach area. Stand or sit at the normal workbench position and sweep both hands through a comfortable range without leaning or twisting. Reserve this area for the small group of tools used in most sessions. The goal is fewer awkward reaches, not maximum density.
Zone 2: the secondary reach area. Place weekly tools and task-specific sets just outside the primary zone. Group them by sequence: measuring and marking, fastening, cutting, electrical, detailing, or another workflow that fits the garage. A complete task group is more useful than a decorative row of similarly shaped handles.
Zone 3: the low secure area. Use the lower section for heavier objects that are appropriate for the installed system, provided they remain above impact, water, and floor-cleaning hazards. Avoid knee-level projections into a walking path. Heavy tools may belong in Garage Tool Storage instead when the pegboard accessory cannot cradle them securely.
Zone 4: the upper reserve area. Store light, infrequently used items where they can be reached safely. Do not turn the top row into a shelf of loose containers above a person, vehicle, or bench. If an item requires a step stool, decide whether its use frequency and fall consequence justify that location.
The garage storage zone planning guide helps connect this wall with parking, doors, household storage, and work areas. A well-organized board can still be poorly located if tools swing into a doorway or protrude where a vehicle mirror passes.
Select the Accessory by Support Pattern
Single hooks
Use short single hooks for light items with a stable hanging hole or closed handle. Keep the load near the panel rather than at the tip. Check whether removing the item tends to lift the hook. If it does, use a locking or retaining accessory that the panel manufacturer supports.
Double hooks and cradles
Two prongs or two separate supports can resist rotation and distribute contact across a wider item. They are useful for handles, small cases, and irregular shapes, but spacing must match the item. Verify that both supports engage the same approved system and that one cannot disengage while the other remains loaded.
Rings, clips, and tool-specific holders
Rings can support screwdrivers and round-handled tools when the handle cannot slip through. Spring clips can hold cylindrical objects within a documented diameter range. A purpose-built drill, wrench, plier, or socket holder can reduce improvisation, but its label must match the exact tool shape and panel. See pegboard accessories for power tools for body support, battery clearance, and cord considerations.
Shelves
A shelf adds leverage because its load projects away from the panel. Verify the shelf assembly, brackets, panel, installation, and distributed-load instructions together. Keep containers away from the outer edge and avoid top-heavy arrangements. A shallow shelf for light supplies is not a universal power-tool platform.
Bins
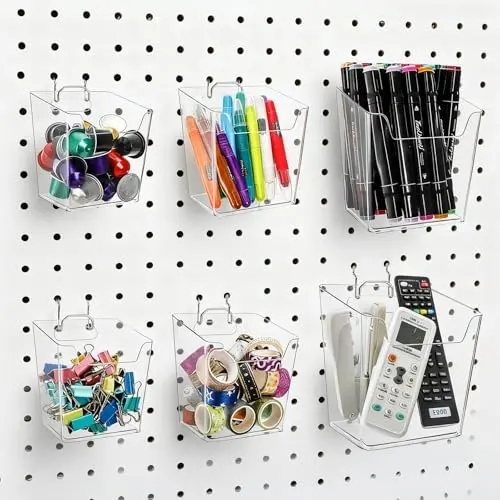
Pegboard bins work best for a modest amount of active hardware, sanding discs, wire connectors, markers, or other light consumables used at the bench. Label the front and set a refill limit. For many loose fasteners, deeper inventory, portable job kits, or items that must remain separated, use Small Parts Organizers rather than forcing the entire small-parts system onto the wall.
The detailed hooks versus bins versus shelves comparison covers these formats one at a time. The practical layout often uses all three, but each should solve a different storage job.
Plan Spacing With Real Tools, Not Empty Hooks
Install a small trial group before filling the panel. Hang the actual tools, remove each one several times, and watch the neighboring items. Increase spacing if knuckles scrape the panel, sharp edges touch, handles cross, or a tool must be tilted through another tool’s space. Leave room for labels and for the locking motion required by the accessory.
Projection matters as much as side-to-side spacing. A long hook places the load farther from the wall and may create a collision or leverage problem. Use only the reach needed for the item. Do not create a forest of empty hook length in a walking aisle or above a seated position.
Keep corded tools, chargers, batteries, and liquids separated according to their instructions. Do not drape a cord across sharp metal, support a charger by its cable, or place leaking containers over electrical equipment. If the wall holds lubricants, adhesives, aerosol cans, or chemicals, follow each container’s storage instructions and local household hazardous-waste guidance rather than treating an open bin as universal storage.
Use a Complete-System Load Check
There is no responsible universal “pegboard holds this much” number. Capacity can be limited by the wall substrate, anchors, studs or masonry, panel material, panel fasteners, spacing from the wall, accessory engagement, retained contact points, bracket projection, load position, impact, vibration, wear, moisture, and installation quality. The lowest applicable limit controls.
Wall Control’s manufacturer guidance explicitly ties its recommendations to proper installation, substrate, accessory type, load distribution, and where weight sits on a hook or shelf. Triton’s product families likewise specify their matching boards, hole patterns, retainers, spacer hardware, and accessory series. Use the instructions for the exact panel and accessory combination; do not transfer a rating from a different board, mount, hook, or marketing photo.
OSHA’s material-storage rule is written for workplaces, not as a residential pegboard specification, but its general principle is useful: stored material should remain stable and secure against sliding or collapse, and storage areas should not create trip or fire hazards. Apply that principle at home by securing stored items, keeping projections out of travel paths, and choosing another storage format when the consequence of a fall is high.
After mounting, test with the tool under controlled conditions while no person, vehicle, glass, battery, or finished work sits below it. Observe the panel, fasteners, hook engagement, and tool movement. A successful first hang does not replace periodic inspection.
Keep Hooks From Lifting Out With the Tool
A common failure is not a broken hook; it is an unretained hook that rises when the tool is lifted. Choose locking tabs, clips, stabilizers, double-offset engagements, or other retention methods documented for the panel. Do not rely on tape, bent wire, zip ties, or improvised fasteners when they prevent inspection, damage the panel, or contradict the manufacturer’s installation method.
Removal technique also matters. Lift the tool only as far as its hanger requires, then move it away from the wall. If the hook repeatedly comes out, the fit, retention, spacing, or removal path is wrong. The guide to stopping pegboard hooks from falling out walks through those corrections.
Lay Out Power Tools Without Loading Weak Features
Support a power tool at a structural part identified as suitable by the holder or tool instructions. Do not suspend it by the trigger, trigger guard, cord, hose, battery latch, blade guard, chuck key, accessory bit, or another feature not intended to bear the tool’s stored weight. Remove accessories that create a cutting or puncture hazard when appropriate, and keep batteries and chargers in conditions allowed by their manuals.
Use two-point support for tools that can rotate. Check that a cradle does not press a control and that the tool cannot bounce free when a nearby door closes or another item is removed. Put the heavier tool lower, keep sharp ends away from face level, and avoid storage directly over a vehicle hood or the workpiece area.
If the tool does not have a stable pegboard solution, choose a drawer, cabinet, shelf, or dedicated rack. Pegboard is valuable because it is flexible, not because every tool must be forced onto it.
Reserve Space for Growth and Maintenance
Leave a meaningful portion of the board open rather than filling every hole on day one. Expansion space makes it possible to add a new tool near the task it serves instead of rebuilding the entire wall. Keep a small labeled container of unused compatible hooks and retainers off the prime work surface.
Use removable labels or tool outlines only when they help people return items. A shadow outline is useful in a shared shop where missing tools need to be obvious; it can become visual noise in a personal garage that changes often. Photograph a layout that works before a seasonal reconfiguration.
Dust, moisture, coatings, and corrosion can affect panels and accessories differently. Inspect for softened hardboard, enlarged holes, rust, bent wire, cracked plastic, missing retainers, loose panel fasteners, or movement at the wall. Clean and repair according to the manufacturer’s instructions. Do not paint over engagement points or use a finish that changes hole fit without documented approval.
Follow This Eight-Step Layout Workflow
- Identify the system: Record panel material, hole or slot type, spacing, thickness, rear clearance, mounting method, and manufacturer.
- Inventory the tools: Measure shape, weight, center of mass, handle, removal motion, sharp features, cable or hose, and use frequency.
- Map the wall: Mark bench position, comfortable reach, doors, vehicles, lights, receptacles, cabinets, walking paths, water, and heat.
- Assign zones: Put daily light tools in primary reach, weekly tools nearby, suitable heavier items low, and light reserve items high.
- Choose support patterns: Match single hooks, paired hooks, cradles, rings, clips, shelves, or bins to the actual item.
- Verify the complete system: Check compatibility, retainers, fasteners, substrate, installation, distribution, projection, and every applicable limit.
- Prototype one task group: Hang real tools, test removal and return, increase clearance, and correct any lifting, rotation, or collision.
- Expand and inspect: Build outward from proven groups, leave growth room, label where useful, and schedule fastener and accessory checks.
For a broader wall choice, compare Garage Wall Storage before committing more area. Pegboard offers fine-grained repositioning; slatwall, rails, cabinets, shelves, and bins can be better for bulky, enclosed, or high-capacity storage. The Garage Hardware & Small-Parts Organization hub connects these formats without collapsing their different jobs.
Reject a Layout When Any of These Are Unresolved
- The panel system, hole pattern, accessory series, or required rear clearance is unknown.
- An accessory merely fits through the opening but the manufacturer does not support the pairing.
- The complete load path from tool to holder to panel to fastener to wall has not been checked.
- A heavy, sharp, awkward, or expensive item can rotate, slide, lift the hook, or fall into an occupied area.
- A tool must collide with another item, a shelf, a door, a vehicle, or the user’s hand to be removed.
- A power tool hangs from a trigger, guard, cord, hose, battery latch, or another feature not intended as a support point.
- Bins hide excessive weight, mixed chemicals, leaking containers, or small parts that require secure compartments.
- Hooks project into a walking path or tools hang above a vehicle, glass, battery, workpiece, or seated person without suitable retention.
- The panel or accessory shows enlarged holes, bending, rust, cracking, loose fasteners, missing locks, or movement at the wall.
- A seller claim about compatibility or capacity cannot be matched to the exact manufacturer documentation.
Frequently Asked Questions
Should pegboard tools be arranged by type or by task?
Arrange the prime zone by repeated task sequence. Keeping measuring, marking, drilling, and fastening tools near the work they support usually saves more motion than grouping every tool only by appearance. Reserve broader type groupings for secondary or shared storage.
How much empty space should I leave?
Leave enough room to remove every tool without touching its neighbors and preserve an open area for future additions. There is no universal percentage; the correct buffer depends on tool movement, accessory locking motion, labels, and how often the inventory changes.
Can I mix accessory brands?
Only when the panel and accessory manufacturers document the relevant hole or slot standard and the fit is secure. Some panels accept conventional accessories plus a proprietary system; others do not. Match the exact model, hole shape, spacing, thickness, and retention method rather than relying on a generic “pegboard compatible” label.
Are long hooks stronger than short hooks?
Length alone does not establish strength. A longer projection can increase leverage and collision risk. Use only the reach needed, keep the load near the panel, and follow the exact hook, panel, installation, and distributed-load instructions.
Where should heavy tools go?
Keep them low and use a documented holder with positive retention if the complete pegboard system supports the load. Otherwise move them to a shelf, cabinet, drawer, or dedicated rack. Avoid heavy storage over vehicles, benches, glass, batteries, or occupied positions.
Are pegboard bins good for nuts and bolts?
They can work for a small amount of active stock that is light, labeled, and easy to inspect. A larger fastener inventory is usually better in divided cases, drawers, or removable-bin systems that preserve size separation and can be carried to the job.
How often should a pegboard layout be inspected?
Inspect after installation, after adding or moving a significant load, after impact or vibration, and whenever a hook, panel, or fastener moves. Also perform periodic checks for wear, enlarged holes, corrosion, moisture damage, missing retainers, loose mounts, and changes to the surrounding traffic path.
Final Verdict
A strong pegboard layout begins with the real tool inventory and the work sequence. Confirm the panel standard, choose a support pattern for each item, reserve the easiest reach for frequent tools, keep consequential loads low and retained, and leave clearance for hands, removal, and future growth. Judge capacity through the entire mounted system rather than a single headline number.
Use the Pegboard Accessories collection to compare formats after completing the worksheet, keep Garage Pegboard Storage as the parent system, and move large hardware inventories to dedicated small-parts organizers when open wall bins stop being the right tool. That division keeps the board useful, the wall readable, and each storage format focused on the job it performs best.