How to Plan Garage Storage Zones: A Step-by-Step Layout Guide
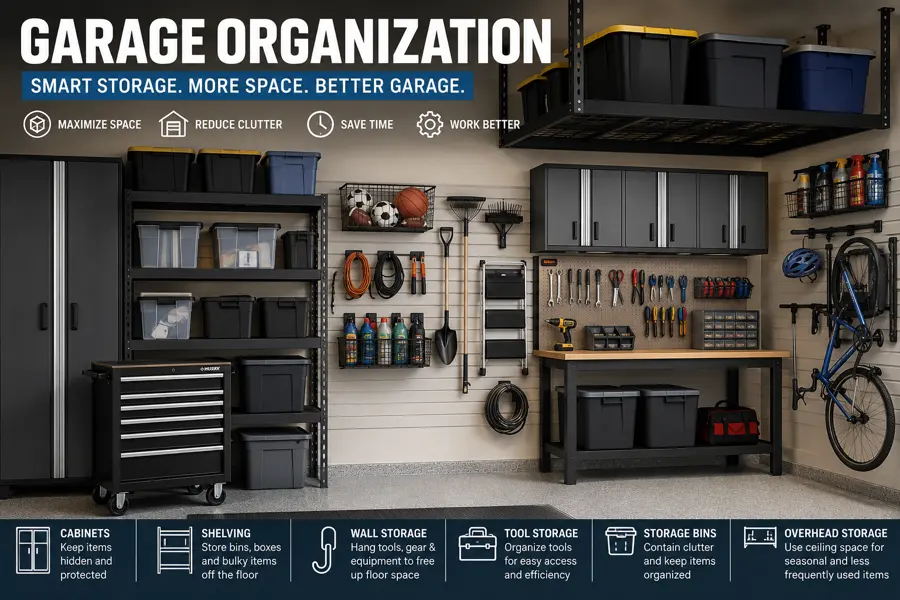
A garage storage plan should begin with movement and activities, not with a shopping list. When shelves, cabinets and hooks are purchased before the room is mapped, they often occupy the wrong wall, block a vehicle door or divide items that are used together. A zone plan assigns each part of the garage a job, then selects storage that supports that job.
Quick Answer
Plan garage storage zones in this order: protect the vehicle and walking paths, mark fixed obstacles, group belongings by activity, rank each group by access frequency and weight, then assign the groups to floor, wall and overhead space. Keep daily items between waist and shoulder height, dense objects low, lightweight seasonal containers high, and hazardous products in their original labeled containers according to product and local safety requirements.
This guide focuses specifically on layout: where each category should live before organizers are installed. For decluttering and maintenance routines, use the companion garage organization how-to guide and the ten practical organization tips.
What Is a Garage Storage Zone?
A storage zone is a defined area built around one activity or family of related items. A vehicle-care zone might hold wash supplies, tire tools and a portable compressor. A workshop zone might combine a bench, lighting, hand tools and small-parts drawers. The zone is successful when a person can start, complete and clean up the activity without crossing the garage repeatedly.
Zones do not need walls or permanent labels. A shelving bay, six feet of slatwall or one mobile cart can form a complete zone. The important distinction is ownership: every useful item has one logical home, and every section of valuable garage space has a planned role.
Step 1: Protect the Parking and Walking Envelope
Park the largest vehicle that normally uses the garage. Open every passenger door, the liftgate or trunk and the garage door. Mark the required clearance on the floor with removable tape. Include mirror width, charging-port access if relevant, and the space needed to carry groceries or equipment into the house.
Next, mark a continuous walking route between the vehicle, home entrance and exterior exit. Keep required access to electrical equipment, utilities and shutoffs clear. This movement envelope is the center of the floor plan. Cabinets, rolling carts and deep shelving must fit outside it when doors and drawers are open—not merely when everything is closed.
Step 2: Map the Fixed Obstacles
Draw a simple overhead sketch and record the garage door tracks, opener, windows, attic hatch, steps, support posts, water heater, laundry equipment, freezer, outlets, switches, lights and any ventilation openings. Measure usable wall width and ceiling height rather than estimating from an empty corner.
Fixed equipment often determines the only sensible location for a zone. A workbench benefits from existing task lighting and outlets. A sports-return zone is more useful near the exterior door. Overhead racks must avoid the open garage door, opener, lights and the tallest part of the vehicle. Storage should never obstruct equipment clearances or ventilation specified by the manufacturer or applicable requirements.
Step 3: Inventory by Activity and Access Frequency
Sort belongings into activity groups before deciding which container they need. Useful groups include vehicle care, household repair, woodworking, gardening, cleaning, sports, cycling, camping, holiday décor, bulk household stock and small hardware. Photograph large or awkward objects and measure the items most likely to dictate shelf depth or hook spacing.
Then mark every group as frequent, periodic or seasonal. Frequent equipment deserves the easiest reach and shortest travel path. Periodic items can occupy upper or lower shelves. Seasonal items can move to perimeter or overhead space if they are lightweight enough to retrieve safely. This access ranking prevents holiday bins from occupying the best shelf while weekly tools remain buried.
Step 4: Assign the Eight Core Garage Zones
| Zone | Best location | Useful storage layer |
|---|---|---|
| Arrival and household transition | Beside the home entry | Hooks, shallow shelves, return basket |
| Vehicle care | Near the garage door or vehicle nose | Low cabinet, cart, contained shelving |
| Workshop and tools | Wall with light and safe power access | Workbench, pegboard, drawers |
| Yard and cleaning | Near the exterior door | Rail, hooks, upright tool rack |
| Sports and outdoor gear | Easy family access | Open baskets, ball rack, bike hooks |
| Seasonal and bulk storage | High shelves or safe overhead area | Lidded labeled bins |
| Small parts | Within reach of the workbench | Compartment cases, drawer cabinets |
| Floor and parking support | Vehicle and standing areas | Mats, tiles, containment protection |
1. Arrival and Household Transition Zone
Place this zone beside the door into the house. It can hold reusable bags, work shoes, pet-walk supplies, small returns and items that need to move inside. Keep it shallow so it does not narrow the walking path. An open basket for misplaced objects prevents the entry shelf from becoming a permanent pile.
2. Vehicle-Care Zone
Group wash supplies, detailing tools, tire equipment and routine vehicle accessories close to the driveway side of the garage. Store dense bottles low and upright in a tray that can contain small leaks. A rolling cart can work when supplies are used around the vehicle, but it needs a defined parking position outside the door-clearance envelope.
Use the Garage Equipment & Car Care hub to separate cleaning, lifting, compressed-air and electrical needs rather than crowding them into one cabinet.
3. Workshop and Tool Zone
The workshop zone should reduce walking between the work surface, tools and parts. Place frequently used hand tools on garage pegboard storage or a compatible wall panel, portable sets in tool boxes, and larger equipment in garage tool storage. Keep the bench clear enough for the projects it is meant to support.
One representative option is the Ultrawall pegboard organizer listing on Amazon. Verify the live package contents, panel dimensions, compatible accessories and installation instructions before purchasing.
4. Yard and Cleaning Zone
Locate rakes, brooms, shovels, trimmers, hoses and cleaning tools near the exterior door. Long-handled tools need positive support rather than a leaning stack. Check the full depth of each hanging item; a rail can fit the wall while a tool handle still conflicts with the vehicle.
Compare the garage wall storage collection and this current garage-hook set listing on Amazon. Installation capacity depends on the exact product, fasteners, spacing and wall structure, so follow the manufacturer’s documentation.
5. Sports and Outdoor Gear Zone
Make lightweight active gear easy for the people who use it to return. Balls and helmets work well in open baskets; bats, rackets and bags need divided positions; bicycles require verified wall or floor capacity and enough room for pedals and handlebars. Keep children’s return points low and separate from sharp tools, chemicals and heavy overhead objects.
A sports-equipment storage rack listing on Amazon can help illustrate the footprint required for golf bags and mixed gear. Confirm the assembled measurements before assigning the zone.
6. Seasonal and Bulk Storage Zone
Holiday décor, camping equipment and occasional household stock can use high shelving or overhead storage after the active zones are established. Choose a small number of compatible bin footprints, label the visible side and keep the filled weight manageable. Never create an overhead zone without planning how each container will be lifted and lowered under control.
Review overhead garage storage and the current FLEXIMOUNTS overhead-rack listing on Amazon for a representative format. The seller’s current specification is not an installation guarantee; ceiling structure, fasteners and the full manual determine safe use.
7. Small-Parts Zone
Screws, anchors, washers, electrical connectors and repair pieces need a more precise layer than a deep tote. Put small-parts organizers close to the bench and label by useful family before subdividing by every possible size. Leave a clear work area for opening cases or drawers without blocking the aisle.
The Garage Hardware & Small-Parts Organization hub explains how pegboard, bins, drawers, tool boxes and broader wall storage can work together without duplicating the same job.
8. Floor and Parking Support Zone
The floor remains an active zone even when nothing is stored on it. Mark tire positions, door swing and the walking route. Place anti-fatigue or surface-protection products where work or drips actually occur instead of covering areas that must stay clear. The Garage Flooring & Floor Protection hub compares mats, modular tiles and coating-style approaches.
Step 5: Use Three Vertical Storage Levels
Divide each wall into low, reach and high levels. The low level belongs to dense tools, fluids and containers that must be handled with control. The reach level—roughly waist to shoulder height for the household—belongs to daily equipment and visible labels. The high level belongs to lightweight, infrequently used items that can be retrieved safely.
This vertical rule is more useful than trying to maximize every cubic foot. Storage density is not the goal. A shelf that is packed to the ceiling but cannot be accessed without unloading three bins is poor storage, even if it looks efficient on paper.
Step 6: Choose the Storage System After the Zone Map
Once every category has a location, select the structure that matches it. Freestanding shelving supports bins and bulk supplies. Cabinets visually contain tools and supplies. Pegboard keeps small active tools visible. Slatwall or rail systems handle adjustable hooks and baskets. Overhead racks serve lightweight seasonal storage. Mobile carts support tasks that move around the vehicle.
Use the garage storage systems collection to compare coordinated approaches. A current garage slatwall-panel listing on Amazon represents an adjustable wall field, while this garage cabinet-system listing represents a more enclosed workshop build. Verify current dimensions, package contents and compatibility on each listing.
Planning Different Garage Sizes
One-Car or Narrow Garage
Protect the vehicle envelope first and choose shallow storage. One strong wall system is usually better than several incompatible rails. Put the workshop on a folding or compact bench, use tall shelving at the back only when the vehicle length permits it, and avoid deep cabinets beside passenger doors.
Two-Car Garage
Decide whether both bays must remain available every day. If they do, use perimeter walls and a back-wall work zone. If one bay is occasionally a project area, use mobile storage that can return to a defined parking position. Keep the path from both vehicles to the house clear.
Three-Car or Tandem Garage
Extra square footage can still become unstructured overflow. Assign the third bay or tandem area a primary purpose—workshop, sports staging, vehicle care or bulk storage—and give it capacity limits. Do not let seldom-used boxes consume the flexible project space by default.
Hazardous and Temperature-Sensitive Items Need Separate Rules
A zone label does not override a product label. The U.S. Environmental Protection Agency advises keeping household hazardous products in their original containers, retaining labels and never mixing leftovers because incompatible materials can react, ignite or explode. Use the current EPA household hazardous waste guidance and local disposal instructions for products that require special handling.
Do not place chemicals in food containers or treat an ordinary cabinet as universal hazardous-material storage. Batteries, paints, fuels, cleaners and temperature-sensitive products have different conditions. Follow the specific label, equipment manual and local requirements, and keep incompatible or child-accessible materials out of general family-return zones.
A 90-Minute Garage Zone Planning Exercise
- Minutes 0–15: Park the vehicle, open doors and mark movement clearances.
- Minutes 15–30: Sketch walls, fixed equipment, outlets and overhead obstacles.
- Minutes 30–50: List activity groups and mark each frequent, periodic or seasonal.
- Minutes 50–65: Assign the eight zones without purchasing storage.
- Minutes 65–75: Place heavy, daily and seasonal items at the correct vertical level.
- Minutes 75–90: Measure the largest object in every zone and create the actual shopping list.
Take photographs and save the measurements. When comparing garage organization products, reject anything that does not fit the plan—even if it is discounted or visually appealing.
Garage Storage Zone Buying Checklist
- Does the product fit outside the parked vehicle and door-clearance envelope?
- Does its usable interior fit the largest item, not merely the product’s exterior footprint?
- Is the wall, floor or ceiling structure appropriate for the documented installation?
- Are compatible expansion hooks, shelves or bins clearly identified?
- Can the heaviest item be placed and removed with control?
- Will drawers, cabinet doors or hanging gear block the walking path?
- Does the zone have room to return items without moving other storage?
- Are hazardous or temperature-sensitive items being handled according to their own requirements?
Frequently Asked Questions
How many zones should a garage have?
Use only the zones supported by real activities. Most households need five to eight. A narrow garage may combine arrival and sports gear or workshop and small parts, provided each category still has a defined home.
Where should the most-used tools go?
Place them in the reach level next to the activity they support. Daily hand tools belong near the bench; yard tools belong near the exterior door; vehicle-care supplies belong near the driveway side.
Should cabinets or open shelving come first?
Choose after the zone inventory. Open shelves make labeled bins and bulky equipment easy to reach. Cabinets reduce visual clutter and ordinary dust. Many garages work best with shelves for bulk storage and one cabinet for controlled, enclosed categories.
What should never go in overhead garage storage?
Avoid dense items that are difficult to lift, loose objects that can fall, leaking containers and anything whose label or manual prohibits the garage environment. Use secure lightweight bins and follow the rack’s installation and loading instructions.
How do I keep zones from spreading?
Give each zone a physical boundary and capacity limit. When it fills, edit the category before adding another shelf. Use a short reset after projects and a seasonal review when gear rotates.
Final Verdict
A durable garage layout protects movement first, groups belongings by activity and assigns storage only after the zones are measured. Keep active items easy to reach, dense equipment low, lightweight seasonal bins high and hazardous products under their own rules. Then choose the smallest coordinated mix of shelves, cabinets, wall storage, bins and overhead racks that supports the map. Start with the broader garage storage collection or Garage Products when the plan is ready for specific product comparisons.