Best Pegboard Accessories for Power Tools
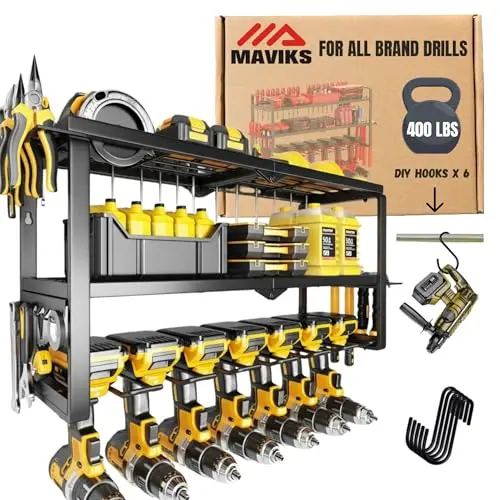
Power tools ask more of a pegboard than ordinary hand tools. Their weight is concentrated, housings are irregular, batteries change balance, and cords or triggers can be damaged by a poor holder. This guide evaluates the station as a complete system—from panel and wall mounting to drill holders, shelves, battery storage, and small-parts bins.
Quick Answer
The most useful power-tool pegboard accessories are model-compatible drill holders, reinforced shelves, battery and charger mounts, cord retainers, and bins for bits and small parts. Choose by the complete system’s rated load and the tool’s shape—not by hook count.
Start by comparing the options in our Pegboard Accessories collection, then use this guide to read ratings and compatibility details with a more critical eye. The broader Garage Pegboard Storage section also helps place this purchase in the rest of a functional garage plan.
Compare Pegboard Accessories on Amazon after you have written down your required hole size, hole spacing, board thickness, attachment style, and the weight and shape of the item. A short requirement list prevents an attractive feature from hiding a poor fit.
Start with tool geometry
A drill, circular saw, grinder, sander, and nailer each place weight differently. The best holder captures a stable part of the housing without pressing a trigger, pinching a cord, blocking ventilation, or relying on a narrow accessory that can rotate.
Start with the bare tool and its usual battery. A drill with a large pack hangs differently from a compact driver. Measure the grip, housing width, battery footprint, and center of gravity so the holder supports a stable surface without touching the trigger.
Dedicated holders vs general hooks
Purpose-built racks can improve retention and spacing, while paired heavy hooks are more adaptable. Dedicated shapes work best for a stable tool fleet; adjustable hooks help when models and battery platforms change.
Dedicated drill slots create repeatable positions, while paired heavy hooks adapt better when the tool fleet changes. The panel, wall attachment, and holder must all have documented capacity for the combined load.
See current pegboard accessory choices on Amazon and compare the same fields across several models rather than jumping between unrelated feature lists.
Battery organization
Battery shelves and individual mounts keep packs visible and off the bench. Confirm the mount fits the battery interface without stressing contacts. Chargers need ventilation, cable management, and electrical placement that follows their manuals.
Shelves are often better for compact saws, sanders, routers, and cases. Compare shelf depth, front lip, bracket spread, and removal clearance. Avoid tilting a heavy machine toward your face.
Shelves for awkward equipment
Compact saws, sanders, and cases may sit better on a reinforced shelf than hang from a hook. Verify shelf depth, lip, bracket spacing, panel capacity, and the wall mounting behind the pegboard.
Battery mounts should support the pack without stressing contacts or release tabs. Keep batteries away from grinding dust, moisture, direct heat, and impact zones, and follow the maker’s storage instructions.
A useful cross-check is the wider Garage Pegboard Storage catalog, because the surrounding equipment can expose a compatibility issue that is easy to miss when the pegboard accessory is considered alone.
Browse more Pegboard Accessories options with those system limits in mind.
Bits, blades, and consumables
Small bins, magnetic strips where appropriate, screwdriver racks, and labeled cups make the tool station complete. Store sharp blades with guarded edges and avoid open bins where vibration can shake small parts onto the floor.
Chargers need ventilation and an arrangement permitted by their manuals. Do not bury vents behind a bin or wind cord around sharp hooks. Control slack without tension on the plug.
Layout for workflow
Group tools by task and put frequent items between shoulder and waist height. Heavy or awkward tools belong lower. Leave enough clearance to lift each tool off its holder without striking a shelf or pulling adjacent accessories loose.
Use labeled bins for bits, fasteners, and consumables, guarded storage for sharp blades, and clear separation between charged, spent, and damaged batteries.
Check Pegboard Accessories specifications and availability only after confirming that the listing identifies the size, rating, and included hardware clearly.
Buying a kit intelligently
Large kits can look economical but create waste if most pieces do not match your tools. Inventory the tool shapes first, then buy a smaller foundational set plus dedicated holders. Compatibility and useful capacity matter more than accessory count.
Leave expansion space. Tool platforms change, and open columns let you add a holder or widen spacing without rebuilding the entire wall.
How to Compare a Shortlist Without Getting Distracted
Build a simple comparison table with one row for each candidate and columns for the requirements that can actually disqualify a product. Put hole size, hole spacing, board thickness, attachment style, and the weight and shape of the item first. Add dimensions, included parts, installation limits, warranty terms, and the model number. Leave a cell blank when the listing does not provide an answer; do not quietly replace missing information with an assumption. A product with fewer decorative features but complete documentation is often easier to evaluate responsibly than a feature-heavy listing that hides basic limits.
Next, separate requirements from preferences. A compatible connection, adequate rating, permitted mounting orientation, and safe operating environment are requirements. Color, extra accessories, a remote, or a particular storage style may be preferences. This order prevents a convenient feature from outweighing a mismatch that will affect every use. It also makes price comparisons fair because the remaining candidates are capable of the same core job.
Plan for Ownership, Not Just Installation Day
Think through inspection, cleaning, adjustment, storage, and eventual replacement before fixing a model to the garage. Moving parts, flexible materials, electrical contacts, seals, brackets, and fasteners can all need attention depending on the category. Service access matters. A product mounted tightly behind shelving or above a vehicle may be frustrating to inspect even if it technically fits. Keep the manual and model information where another household member can find them.
After installation, use a calm first-use test. Keep people, vehicles, and valuable tools clear, operate at a light demand, and watch the mounting, connections, controls, and working path. Stop for unexpected heat, noise, movement, leakage, binding, odor, or damaged insulation. A successful light test does not authorize exceeding the published rating; it simply confirms that assembly and basic operation appear normal before regular work begins.
A Simple Buying Checklist
Before ordering, write down the intended job, maximum demand, available space, mounting or storage location, environmental exposure, and every required connection. Confirm that the stated rating applies to the complete assembled product and to the way you will operate it. Look for understandable instructions, replacement parts where relevant, and a return path if the dimensions or interface do not match.
Do not treat customer photos or star averages as substitutes for specifications. Reviews are useful for spotting repeated usability issues—awkward latches, weak guides, confusing instructions, premature leaks, or difficult adjustment—but the model number and manual establish what the product was designed to do. Recheck the listing before purchase because sellers can combine variations on one page.
Shop Pegboard Accessories on Amazon once the checklist is complete, or return to our Pegboard Accessories page to compare the category in context.
Design the Station From the Heaviest Tool Outward
Place the largest approved holder first, then reserve removal clearance above and beside it. Add drills where batteries will not collide, followed by chargers, cord control, and bins. Keep heavy tools at a comfortable lifting height and away from vehicles, walkways, and child-accessible areas. If the panel documentation does not support the load, use a shelf tied directly to structure, a cabinet, or another purpose-built system.
Compare Capacity Honestly
A holder rating is only one number. Review the panel rating, wall attachment, bracket spacing, load projection, and combined weight of adjacent tools. A deep saw creates different leverage from the same weight held near the wall. Use the lowest applicable published limit.
Create a Safe Charging Zone
Chargers should stay visible, ventilated, dry, and easy to disconnect. Provide cord slack without loops hanging into the work area. Keep metal chips and grinding debris away from contacts. A neat layout never overrides electrical and environmental limits in the charger and battery instructions.
Test the Daily Workflow
With light nonvaluable items installed, rehearse removing a tool, setting it on the bench, reaching its accessories, and returning it. Watch for knuckle contact, accidental trigger contact, a battery striking the panel, or a cord catching a neighboring hook. Adjust spacing before the station fills.
Continue the Pegboard Accessories Guide Series
- What Pegboard Hooks Fit My Pegboard?
- Pegboard Hooks vs Bins vs Shelves
- How to Stop Pegboard Hooks From Falling Out
- Metal vs Hardboard Pegboard Accessories
Return to Pegboard Accessories, compare panels in Garage Pegboard Storage, or expand through Garage Power Tool Storage.
Frequently Asked Questions
Is the most expensive pegboard accessory automatically the best?
No. Price can reflect materials, capacity, accessories, or brand support, but the best choice is the model whose documented limits match your job and installation without paying for features you will not use.
Can I rely on a marketplace title for sizing?
No. Titles are shortened and variations are sometimes grouped. Verify the exact model number, manual, dimensions, ratings, included fittings or hardware, and any operating limits before ordering.
How much extra capacity should I buy?
Use the manufacturer’s selection guidance and the demands of the complete system. Sensible margin can help, but arbitrary oversizing can add weight, cost, electrical demand, or awkwardness without improving the job.
What should I inspect when it arrives?
Confirm the model and rating label, examine the housing and working components for damage, inventory the parts, read the instructions, and test operation without exceeding limits before putting valuable tools or vehicles nearby.
When should I ask a professional?
Get qualified help when the installation changes fixed wiring, depends on uncertain structural support, involves code requirements, or operates near hazards that the product documentation does not clearly address.
Final Verdict
The most useful power-tool pegboard accessories are model-compatible drill holders, reinforced shelves, battery and charger mounts, cord retainers, and bins for bits and small parts. Choose by the complete system’s rated load and the tool’s shape—not by hook count. The winning choice is the one supported by clear documentation and installed within every stated limit. Compare the complete system, not one headline feature, and plan how the product will be inspected, stored, or serviced after the first use.
For a final side-by-side look, compare Pegboard Accessories on Amazon. The link uses the exact collection-specific destination supplied for MyGarageProducts.com.
Put each holder inside the complete pegboard layout and selection plan, including tool inventory, reach zones, two-point support, removal clearance, retention, load-path checks, and future expansion.