Pegboard Hooks vs Bins vs Shelves: What Should You Use?
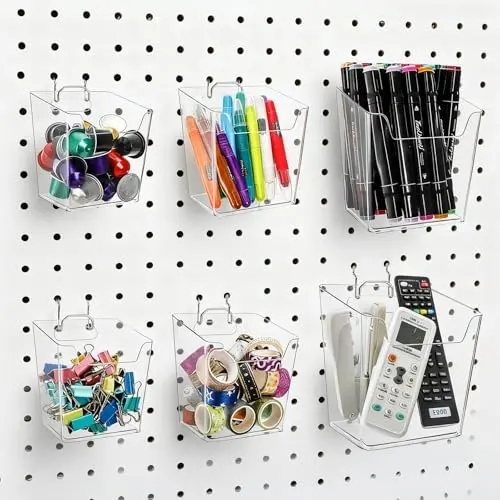
Hooks, bins, and shelves solve different storage problems. Hooks maximize visibility, bins contain loose parts, and shelves support cases or objects that do not hang securely. The right choice depends on shape, weight, removal motion, inventory depth, and how the garage task flows.
Quick Answer
Use hooks for tools with stable hanging points, bins for loose small parts, and shelves for flat-bottomed or awkward items. Most effective pegboards combine all three, assigning each object by shape, weight, frequency of use, and how safely it can be removed.
Start by comparing the options in our Pegboard Accessories collection, then use this guide to read ratings and compatibility details with a more critical eye. The broader Garage Pegboard Storage section also helps place this purchase in the rest of a functional garage plan.
Compare Pegboard Accessories on Amazon after you have written down your required hole size, hole spacing, board thickness, attachment style, and the weight and shape of the item. A short requirement list prevents an attractive feature from hiding a poor fit.
Hooks maximize visibility
Hooks expose the outline of each tool and use very little wall area. They work well for wrenches, pliers, handled tools, cords, and accessories with holes. Retainers help when a frequently lifted tool tends to pull the hook out.
Use hooks for objects with a reliable hanging point that need frequent one-handed access. Match length and shape so the item cannot rotate into a neighbor or slide off during removal.
Bins control loose inventory
Open bins are fast for screws, connectors, sanding discs, and other consumables. Removable designs can travel to a bench. Choose lips and dividers that prevent mixing, and avoid loading tiny panels with rows of dense metal hardware beyond the system rating.
Use bins for small, numerous parts. Labels and a front lip prevent mixing and spills. A deep bin mounted too high becomes an unreadable catchall, so size and placement matter together.
See current pegboard accessory choices on Amazon and compare the same fields across several models rather than jumping between unrelated feature lists.
Shelves support odd shapes
A shelf accepts cases, chargers, bottles, radios, and equipment without a safe hanging point. It consumes more wall area and creates leverage, so depth, brackets, panel mounting, and load placement need more attention.
Use baskets for gloves, rags, safety gear, and irregular packaged supplies. Open mesh reveals contents, but confirm that the basket does not project into a vehicle or walking path.
Accessibility changes the answer
A frequently used wrench deserves an open hook; a rarely used specialty fastener can live in a labeled bin; a charger may need an open ventilated shelf. Storage should reduce steps and errors, not merely produce a tidy photograph.
Use shelves for cases, chargers, cans, and tools without safe hanging geometry. Compare usable depth, front-edge retention, bracket spacing, and the combined shelf-and-panel rating.
A useful cross-check is the wider Garage Pegboard Storage catalog, because the surrounding equipment can expose a compatibility issue that is easy to miss when the pegboard accessory is considered alone.
Browse more Pegboard Accessories options with those system limits in mind.
Weight is a system question
Do not compare accessory ratings in isolation. Board material, fastener spacing, wall structure, brackets, and how far the load projects from the wall all affect the practical limit. Follow the lowest applicable rating.
Specialty holders earn space when they match real inventory. Screwdriver racks, pliers bars, drill holders, and cups can improve density, but an unused specialty shape only creates clutter.
Combine zones instead of forcing one type
Create a hand-tool zone with hooks, a consumable zone with bins, and an equipment zone with shelves or dedicated holders. This prevents a single accessory type from doing a job it handles poorly.
Daily tools belong in the easiest reach zone. Refill packs and rarely used supplies can sit higher or farther aside, while heavy items should never be assigned to an awkward position merely because holes are open.
Check Pegboard Accessories specifications and availability only after confirming that the listing identifies the size, rating, and included hardware clearly.
A simple purchase plan
Photograph and inventory the items, assign each to hook, bin, shelf, or dedicated rack, measure the available grid, and buy only compatible pieces. Leave open spaces for tools that will be added later.
A mixed task zone often works best: hooks for active tools, a shelf for the case, bins for consumables, and a basket for protective gear. Leave clearance to remove each item independently.
How to Compare a Shortlist Without Getting Distracted
Build a simple comparison table with one row for each candidate and columns for the requirements that can actually disqualify a product. Put hole size, hole spacing, board thickness, attachment style, and the weight and shape of the item first. Add dimensions, included parts, installation limits, warranty terms, and the model number. Leave a cell blank when the listing does not provide an answer; do not quietly replace missing information with an assumption. A product with fewer decorative features but complete documentation is often easier to evaluate responsibly than a feature-heavy listing that hides basic limits.
Next, separate requirements from preferences. A compatible connection, adequate rating, permitted mounting orientation, and safe operating environment are requirements. Color, extra accessories, a remote, or a particular storage style may be preferences. This order prevents a convenient feature from outweighing a mismatch that will affect every use. It also makes price comparisons fair because the remaining candidates are capable of the same core job.
Plan for Ownership, Not Just Installation Day
Think through inspection, cleaning, adjustment, storage, and eventual replacement before fixing a model to the garage. Moving parts, flexible materials, electrical contacts, seals, brackets, and fasteners can all need attention depending on the category. Service access matters. A product mounted tightly behind shelving or above a vehicle may be frustrating to inspect even if it technically fits. Keep the manual and model information where another household member can find them.
After installation, use a calm first-use test. Keep people, vehicles, and valuable tools clear, operate at a light demand, and watch the mounting, connections, controls, and working path. Stop for unexpected heat, noise, movement, leakage, binding, odor, or damaged insulation. A successful light test does not authorize exceeding the published rating; it simply confirms that assembly and basic operation appear normal before regular work begins.
A Simple Buying Checklist
Before ordering, write down the intended job, maximum demand, available space, mounting or storage location, environmental exposure, and every required connection. Confirm that the stated rating applies to the complete assembled product and to the way you will operate it. Look for understandable instructions, replacement parts where relevant, and a return path if the dimensions or interface do not match.
Do not treat customer photos or star averages as substitutes for specifications. Reviews are useful for spotting repeated usability issues—awkward latches, weak guides, confusing instructions, premature leaks, or difficult adjustment—but the model number and manual establish what the product was designed to do. Recheck the listing before purchase because sellers can combine variations on one page.
Shop Pegboard Accessories on Amazon once the checklist is complete, or return to our Pegboard Accessories page to compare the category in context.
A Simple Storage Decision Matrix
If the item hangs securely and must stay visible, start with a hook. If it is loose, numerous, and small, start with a labeled bin. If it has a stable base but no safe hanging point, start with a shelf. Use a basket when the group is bulky, soft, or irregular. Then verify compatibility, capacity, projection, and removal clearance.
Match Storage to Replenishment
Consumables need a different plan from permanent tools. Give fast-moving parts a front bin and keep refill stock elsewhere instead of overloading the panel. Add a minimum-level label so it is obvious when screws, blades, discs, gloves, or tape need replenishment.
Prevent a Crowded Wall
Density is not efficiency. Leave finger room around hooks, lift-off space above tools, and clear sight lines to labels. A packed wall slows retrieval and encourages users to leave items on the bench. Review the layout after several real projects and remove accessories that never earn their space.
Plan Hybrid Tool Groups
Some tasks need every format at once. A drilling zone may use hooks for hand drills, a shelf for a case or charger, bins for bits and anchors, and a basket for cords. Keep the group visually connected without exceeding the panel’s load or creating a snag path.
Continue the Pegboard Accessories Guide Series
- What Pegboard Hooks Fit My Pegboard?
- Best Pegboard Accessories for Power Tools
- How to Stop Pegboard Hooks From Falling Out
- Metal vs Hardboard Pegboard Accessories
Return to Pegboard Accessories, compare panels in Garage Pegboard Storage, or coordinate parts in Small Parts Organizers.
Frequently Asked Questions
Is the most expensive pegboard accessory automatically the best?
No. Price can reflect materials, capacity, accessories, or brand support, but the best choice is the model whose documented limits match your job and installation without paying for features you will not use.
Can I rely on a marketplace title for sizing?
No. Titles are shortened and variations are sometimes grouped. Verify the exact model number, manual, dimensions, ratings, included fittings or hardware, and any operating limits before ordering.
How much extra capacity should I buy?
Use the manufacturer’s selection guidance and the demands of the complete system. Sensible margin can help, but arbitrary oversizing can add weight, cost, electrical demand, or awkwardness without improving the job.
What should I inspect when it arrives?
Confirm the model and rating label, examine the housing and working components for damage, inventory the parts, read the instructions, and test operation without exceeding limits before putting valuable tools or vehicles nearby.
When should I ask a professional?
Get qualified help when the installation changes fixed wiring, depends on uncertain structural support, involves code requirements, or operates near hazards that the product documentation does not clearly address.
Final Verdict
Use hooks for tools with stable hanging points, bins for loose small parts, and shelves for flat-bottomed or awkward items. Most effective pegboards combine all three, assigning each object by shape, weight, frequency of use, and how safely it can be removed. The winning choice is the one supported by clear documentation and installed within every stated limit. Compare the complete system, not one headline feature, and plan how the product will be inspected, stored, or serviced after the first use.
For a final side-by-side look, compare Pegboard Accessories on Amazon. The link uses the exact collection-specific destination supplied for MyGarageProducts.com.
Once the accessory type is chosen, continue with the Pegboard Accessory Layout and Selection Guide to place it by task, reach, support pattern, clearance, retention, and complete-system limits.