Car Ramp Selection and Safety Guide: Fit, Capacity, Setup, and Use
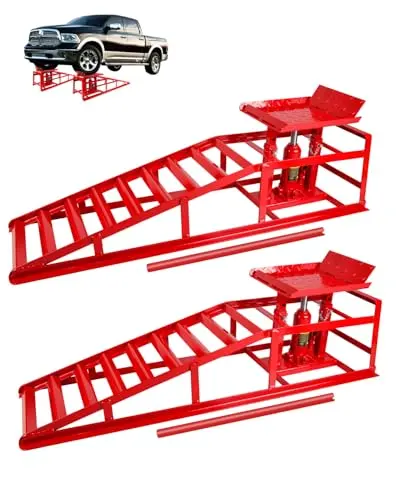
Car ramps look simple, but a safe match depends on more than the largest capacity number on a product page. The vehicle, tire, approach path, garage floor, intended repair, and the ramp maker’s instructions all have to agree. This guide gives you a repeatable way to compare those details before you buy and again before you drive onto the ramps.
Quick Answer
Choose car ramps only for work that can be completed with the supported wheels left on the vehicle. Verify the exact ramp model’s rated application, usable deck width, approach angle, lift height, surface requirements, and inspection procedure against your specific vehicle and job. Use the ramps as a matched pair on the firm, clean, level surface required by the manufacturer; center the tires, prevent unintended movement exactly as instructed, and stop if a ramp shifts, cracks, bends, or cannot be aligned.
Compare current car-ramp options on Amazon
Start With the Repair, Not the Ramp
The first decision is whether the job should use ramps at all. Drive-on ramps keep the tires loaded and support the vehicle through the tire contact patches. That can make them practical for many oil changes, fluid inspections, exhaust checks, splash-shield access, and other center-underbody tasks. They are a poor match when the repair requires a supported wheel to be removed, the suspension to hang, or a manufacturer-specified lifting point to be used.
Write down the exact task and identify every component you must reach. Check whether the vehicle needs to sit level for draining, filling, or measuring a fluid. Confirm whether the parking brake, transmission position, ignition-key control, air suspension, or another vehicle system changes the procedure. The vehicle owner’s manual and the instructions for the exact ramp model take priority over a generic online routine.
If your work requires wheel removal or unloaded suspension, read Car Ramps vs Jack Stands before selecting support equipment. Do not combine ramps, stands, blocks, extensions, or jacks in a configuration that the applicable manufacturers do not document.
The Six Measurements That Decide Fit
1. Rated application and capacity
Capacity language is not standardized enough to compare by one number alone. A listing might describe the vehicle’s gross weight, a pair rating, an individual-ramp rating, or another limit defined by the maker. Read the label and manual for the exact model and configuration. Do not divide vehicle weight by four and assume the result proves compatibility: real axle loads vary with vehicle design, cargo, modifications, fuel, passengers, and the work being performed.
Use the vehicle information and weighing method the ramp manufacturer requests. Reject a candidate if you cannot determine what its published rating means or whether it covers your vehicle type. A comfortable documented margin is useful, but a high rating cannot compensate for poor tire fit, an excessive approach angle, damaged construction, or an unsuitable floor.
2. Usable platform width
Measure the mounted tire where it will rest on the ramp and compare that measurement with the ramp’s usable deck—not its total outside width. The tire must be centered and fully supported according to the manufacturer. Wide truck tires and performance tires can overhang a narrow deck even when the vehicle is well below the advertised capacity.
3. Approach angle and front overhang
A low front bumper, splitter, air dam, or undertray can touch the ramp before the tire reaches the incline. Ground clearance alone does not settle this question; the distance from the tire to the vehicle’s lowest forward point also matters. Longer ramps generally create a more gradual approach for a given rise, but compare the published angle and dimensions rather than relying on a “low-profile” label.
You can screen the geometry without driving onto an unverified ramp: use the maker’s dimensions to model the incline with a straight board or cardboard profile beside the parked vehicle. This is only a clearance check, not a substitute for the manufacturer’s compatibility guidance or a reason to fabricate an extension.
4. Lift height and working clearance
More rise creates more underbody room, yet it also tends to increase the approach challenge and storage footprint. Identify the lowest point you must reach, the space needed for your body and tools, and the location of hot exhaust parts. For an oil change, confirm that a drain pan can enter, sit correctly, and leave without being trapped by the ramp or lowered vehicle.
5. Ramp length, base, and garage space
Measure the complete ramp footprint plus a straight approach and exit path. The pair must sit fully on the approved surface with room to align both tires before they climb. A ramp that fits beneath a shelf after use may still be too long for a short service bay or too awkward to position around a garage-door track, wall, or parked second vehicle.
6. Tire stop and final position
The platform should give the tire a clear final position without requiring you to drive over an edge or guess where to stop. Compare the stop design, deck texture, side guidance, and visibility from the driver’s seat. If the instructions call for a spotter, use one who stands outside the vehicle path and communicates through an agreed signal.
Browse car ramps by dimensions and design
Compare Ramp Designs by the Whole System
| Design | What to verify | Possible advantage | Reason to reject |
|---|---|---|---|
| Molded polymer | Internal structure, base footprint, surface rules, temperature/storage limits, cracks or distortion | Often light enough to position and store easily | Damage, rocking, incompatible tire width, or unclear rating |
| Steel | Welds, bracing, feet, corrosion, deck width, traction, and labeling | Traditional rigid construction with visible structural joints | Bent members, cracked welds, severe rust, rocking, or sharp damage |
| Low-profile foam/composite | Exact model capacity, angle, coating condition, tire centering, and maker’s surface guidance | Long gradual approach for some low-clearance vehicles | Punctures, crushed edges, contamination, or a vehicle outside the approved application |
| Hydraulic or adjustable | Drive-on procedure, locks, pins, lift range, maintenance, and approved support state | Adjustable access where the complete mechanism matches the job | Missing locks, leaks, damaged pivots, incomplete instructions, or improvised support |
No material is automatically safest. The better choice is the undamaged, clearly labeled pair whose complete design fits the vehicle, floor, task, and operator. Use the Car Ramps collection to compare available styles, then verify every decisive number on the exact listing and current manufacturer documentation.
A Selection Workflow That Prevents Expensive Mismatches
- Define one primary job. State whether the wheels remain installed and which underbody areas need access.
- Identify the vehicle exactly. Record year, make, model, trim, drivetrain, modifications, mounted tire size, and any load that changes normal service weight.
- Measure the fit. Check tire width, front or rear overhang, lowest approach point, desired clearance, straight approach distance, and available storage.
- Read the rating definition. Confirm what the stated capacity covers and which vehicles, tires, surfaces, or orientations the maker approves.
- Compare the operating sequence. Include carrying, positioning, driving on, stopping, securing the vehicle, inspecting final tire placement, completing the task, and driving off.
- Apply rejection rules. Remove any model with conflicting specifications, poor documentation, insufficient deck width, excessive approach angle, or a surface requirement your garage cannot meet.
- Confirm the exact listing. Amazon provides the current seller, price, availability, shipping, and return terms. My Garage Products organizes research paths but does not sell, ship, warranty, authenticate, or process returns.
Compare car-ramp listings after measuring your vehicle
Safe Setup: A Deliberate Drive-On Sequence
Manufacturer instructions vary, so the exact manual controls. A cautious general workflow begins by removing grit, loose stones, oil, cords, tools, and other debris from the approach. The UK Health and Safety Executive’s current working-under-vehicles guidance stresses using the right equipment, respecting rated capacity, working on firm level ground, correctly supporting vehicles, and securing wheels that remain on the ground. The guidance is written for workplaces, but those hazard controls are useful context for a home garage.
Set the matched ramps parallel and square to the tires on the surface specified by the maker. Verify that neither ramp rocks and that both are oriented correctly. Center each tire before climbing. Drive slowly and smoothly—do not use a burst of throttle to overcome sliding or poor alignment. Stop immediately if a ramp moves, a tire approaches an edge, the body contacts the incline, or the final position is uncertain.
After reaching the platforms, follow the vehicle and ramp instructions for transmission position, parking brake, ignition control, wheel chocks, and any other restraint. Shut the engine off unless the documented task specifically requires it to run and a suitable procedure controls vehicle movement, exhaust, heat, and communication. Exit and inspect both ramps from outside: the tires should be centered at the intended stop, the ramps should sit flat, and no structural change should be visible.
Do not crawl underneath until every check is complete. Keep another person from entering or starting the vehicle. If the vehicle has adjustable or air suspension, consult its manufacturer’s service procedure before working beneath it; suspension movement can change clearance without warning. Bright garage lighting helps reveal tire position, leaks, debris, and ramp damage, while organized tool storage keeps equipment out of the driving path.
Review current car-ramp formats and specifications
Stop-Use Conditions Matter More Than Brand Reputation
Inspect before every setup. For polymer or composite ramps, look for cracks, whitening or stress marks, crushed cells, distortion, gouges, chemical damage, and worn traction surfaces. For steel ramps, check bends, cracked welds, loose fasteners, displaced feet, sharp deformation, and corrosion that may affect strength. For adjustable equipment, inspect the specified pins, locks, pivots, hydraulic components, and labels.
Stop using the pair if either ramp is damaged, sits differently from its mate, lacks readable identification, or has been overloaded or involved in an incident. Do not repair structural damage with screws, plates, glue, welds, lumber, or filler unless the manufacturer supplies an approved repair procedure. Clean only with compatible products and store the ramps so sunlight, heat, moisture, impact, or stacked loads do not damage them.
Race Ramps’ current manufacturer FAQ, for example, tells users to follow capacity guidance, sweep hard surfaces, center the tires, and avoid driving over the front or side edges. Treat such instructions as model-family guidance and still read the directions supplied with the exact pair you own.
Match the Guide to Your Vehicle and Job
This article owns the complete selection-and-safe-use process. The supporting guides go deeper on narrower decisions:
- Car ramps for oil changes and home maintenance focuses on drain access, repeat setup, and wheel-on service.
- Low-profile car ramps focuses on front overhang, approach geometry, and low-clearance vehicles.
- Car-ramp capacity and width focuses on rating definitions, tire fit, and usable deck dimensions.
- Heavy-duty ramps for trucks and SUVs focuses on wider tires, larger footprints, and higher-load applications.
- Ramps versus jack stands helps decide whether the wheels can remain supported for the planned repair.
For related maintenance categories, start at the Garage Equipment & Car Care hub. If the service bay itself needs work, compare garage floor mats without placing any mat beneath a ramp unless the ramp manufacturer explicitly permits that surface. Keep jump starters and battery chargers in their own accessible vehicle-care zone.
Car Ramp Buying Checklist
- The repair is suitable for wheel-on support.
- The exact vehicle and tire configuration are identified.
- The rating definition and approved application are clear.
- The usable deck fully accommodates the mounted tire as instructed.
- The approach clears the bumper, splitter, undertray, and other low points.
- The rise provides useful access without exceeding another limit.
- The complete base fits a firm, clean, level, approved surface.
- The final tire position and stop are easy to identify.
- The pair can be carried, inspected, cleaned, and stored without damage.
- The listing and current manufacturer documentation describe the same model.
Shop the verified Car Ramps destination
Frequently Asked Questions
Can I use car ramps for a brake job?
Not for a wheel supported by the ramp. Brake, wheel-bearing, tire, and many suspension jobs require wheel removal or unloaded suspension, so they need a different vehicle-specific lifting and support procedure. Define the task before choosing the equipment.
Does a 12,000-pound rating mean each ramp holds 12,000 pounds?
Do not assume that. The number may describe gross vehicle weight, the pair, each unit, or another manufacturer-defined condition. Read the exact model label and manual, then verify your vehicle using the method the maker specifies.
How can I tell whether a ramp is low enough for my car?
Compare the published approach angle and length with the vehicle’s tire-to-overhang geometry. Model the incline beside the parked car to screen for contact, and confirm compatibility in the current ramp instructions. A “low-profile” product name is not proof of fit.
Should I put rubber mats or plywood under car ramps?
Only if the ramp manufacturer explicitly approves that surface and setup. An improvised layer can change traction, support, or load distribution. Use the firm, clean, level surface described in the instructions.
Can I use ramps on a driveway?
Only when the manufacturer permits the surface and it is firm, level, clean, and otherwise suitable. A sloped, soft, cracked, oily, or debris-covered driveway can create movement or uneven support. If the area is unsuitable, move the vehicle to an approved location.
Do I need wheel chocks when using ramps?
Follow the ramp and vehicle instructions for the exact setup. Chocking requirements depend on which wheels are supported, the ramp design, transmission and parking-brake procedure, vehicle type, and the maker’s directions. Use correctly sized, compatible chocks when required; never substitute loose scrap material.
When should car ramps be replaced?
Replace or withdraw them whenever damage, deformation, unreadable identification, an overload, contamination, or another condition violates the manufacturer’s inspection criteria. If you cannot determine whether an incident affected structural integrity, stop using the ramps and contact the maker.
Final Verdict
The right car ramps are not simply the strongest or tallest pair. They are the pair whose documented rating, platform width, approach, rise, base, surface requirements, and operating sequence all match one specific vehicle and wheel-on task. Measure first, reject unclear specifications, and rehearse the drive-on and stop-use procedure before purchase. Once the ramps are in your garage, treat alignment and inspection as part of every job—not as steps to skip after a few successful uses.
Use the broader Garage Products catalog to plan the rest of the service area, but keep the support method tied to the vehicle and repair at hand. Clear documentation and a repeatable setup are more valuable than an unsupported claim of universal fit.